
J-Tech Digital
Model: JTECH-ENCH4
JTD-ID 220

Overview:
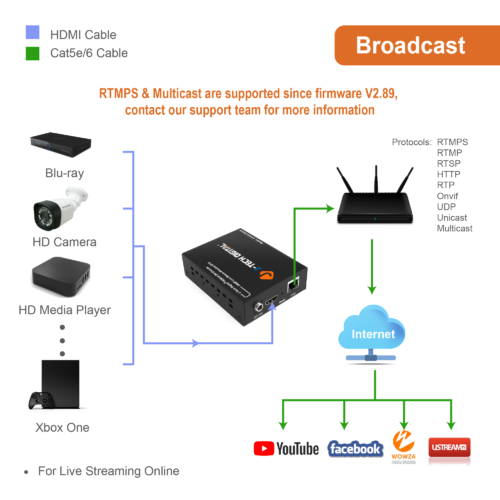
The JTECH-ENCH4 encoder is ideal for broadcasting of audio/video or live stream for TV. You can use a variety of media platforms to stream and broadcast to. The HDMI signal is converted to H.264 and transmitted through standard TCP/IP(Internet/LAN). The encoder is VLC compatible and supports the following resolutions: 1080p@60&50Hz, 1080i@60/50Hz, 720p@60/50Hz, 576p@60/50Hz, 576i@50Hz, 480p@60Hz, 480i@60Hz.
Setup:

- Remove unit and power adapter from plastic covering.
- Place encoder in convenient location.
- Connect 12V power adapter to encoder.
- Connect source device to HDMI port on encoder.
- Connect ethernet cable to LAN port of encoder to the ethernet port on computer.
- Take note of your networks IP address that your computer is wirelessly connected to.
- Set static IP of address of computer to match the default IP of encoder.
Default Encoder IP: 192.168.1.168
PC IP can be set to - 192.168.1.(0-255), for example, 192.168.1.11 - Once done, log into encoders web interface using the encoders default IP address.
- If networks IP scheme is different then the IP scheme of encoder, you may then change the encoders IP address in the web interface to match your networks IP scheme.
- Once done, disconnect encoder from computer and connect it directly to router.
- Go back to the network settings on the computer and set network settings to "Obtain an IP automatically."
- Use new IP address given to encoder to log back into web interface.
- Select Encoder tab, go to main stream tab, set your main stream parameters and input push/stream key URL from desired streaming platform in RTMP publish URL field.
- Enjoy stream or broadcast.


Note* Use link below to get information on how to input key stream/key URL from streaming platform you are streaming to into push URL field on encoders main stream page.

Application:
Troubleshooting:
- If not receiving video signal to streaming site:
- Make sure that the stream type being used is Enabled in the encoder's interface.
- Check to verify stream key from streaming platform is entered correctly into the RTMP publish URL field.
- Test another stream type URL (TS, FLV, RTSP) in the VLC.

- Test another streaming platform.
- Check the status page to see if RTMP URL indicates not "Not connected"
2. If not receiving video signal to VLC:
- Check input source devices is connected properly to encoder.
- Test different HDMI cables.
- Give encoder a power cycle.
- Verify input size of signal shown on status page shows resolution and refresh rate.
- Do a hard reset on encoder.
- Check power, LAN, and HDMI In indicators.
3. If not able to log into web interface:
- Check IP address of PC and verify it matches the IP scheme of encoders default IP.
- Verify the LAN LED is on.
- Try a different browser with default IP.
- Verify you are inputting the correct IP address into web browser.
- Disconnect encoder from PC and connect it to the router/modem to where the unit is going to live.
4. If stream is lagging or buffering:
- Make sure to follow recommended stream platform encoder settings.
- Verify stream key is entered correctly in the Push URL field.
5. If Multicast does not work:
- Keep using a wired connection instead of wireless.
- If firewall was open, make sure VLC player was in the list and allow to pass the firewall.
- Disable some unnecessary network connections, only keep the wired connection.
- Refer to status page to verify the incoming signal shows the resolution, refresh rate, incoming audio etc.
- Refer to status page, under main stream, verify RTMP PUSH URL indicates "Connected".
Comments
0 comments
Please sign in to leave a comment.